Table of Contents
Kodak Portrait
Despite the name, it's 3d. Despite the vendor/label, it's surprisingly mod-friendly
Current status
- configuration still in flux, is editable from the web ui as needed
- not operable; todo:
active cooling for the electronics compartmentmaaaybe done?- Z offset configuration
General notes/instructions
- the stock print surface is a mirror, so try not to break it when removing prints or anything.
- if printing pet-g, wait for the bed to cool down before removing the print, and/or use glue to provide a debonding agent. washing the bed with cold water also works.
- the nozzle on the right (T0; default) is hardened steel; filaments with additives *should* work, but not tested yet
- web interface is available at http://kodak.waw.hackerspace.pl/
- the printer uses the hotend on the right as a Z probe
- the printer has been klipperified (WIP)! stock slicer won't work anymore!
- password for root user is, for now, identical to hswaw wifi password
- host
+ printerconfig is at: https://code.hackerspace.pl/ar/nibylandia/src/branch/main/nixos/akamanto/default.nix - klipper printer config is here temporarily: printer.cfg.zip
- don't do Nix things when a print is in progress; overloads the RPI and makes klipper unhappy
- takes a while to boot; when it's done you should see KlipperScreen interface
profile(s) for slicer(s) (WIP)
PrusaSlicer
Very rudimentary working config. Still needs some adjustments. kodak.zip
There's a bed texture and shape included, but they don't get inlined into config; you'll need to set them yourself. Go to “Printer settings” → “General”, switch settings mode to expert, click “Set” next to bed shape, and load texture and model there.
When adding profiles for more filaments, you may want to lower the temperature from what you'd probably use on other printers, to compensate a bit for the poor part cooling of this printer.
Other slicers?
When configuring other slicers use this for “start g-code”:
PRINT_START T0_USED={ is_extruder_used[0] } T1_USED={ is_extruder_used[1] } T0_TARGET_TEMPERATURE={ first_layer_temperature[0] } T1_TARGET_TEMPERATURE={ first_layer_temperature[1] } BED_TEMPERATURE=[first_layer_bed_temperature]
The printer will handle everything on its own through this macro.
This for “tool change” (subject to change):
G1 Z{layer_z + 5} F5000

T{next_extruder} HOT=1 RETRACT=1

{if layer_num == 0 }
M109 T{next_extruder} S{first_layer_temperature[next_extruder]}
{else}
M109 T{next_extruder} S{temperature[next_extruder]}
{endif}

G1 Z{layer_z}
And this for finishing the print:
FINISH_PRINT
Adjust for macro expansion rules of your slicer. As far as I understand, re-creating these in cura-based slicers may not be trivial.
Hardware documentation
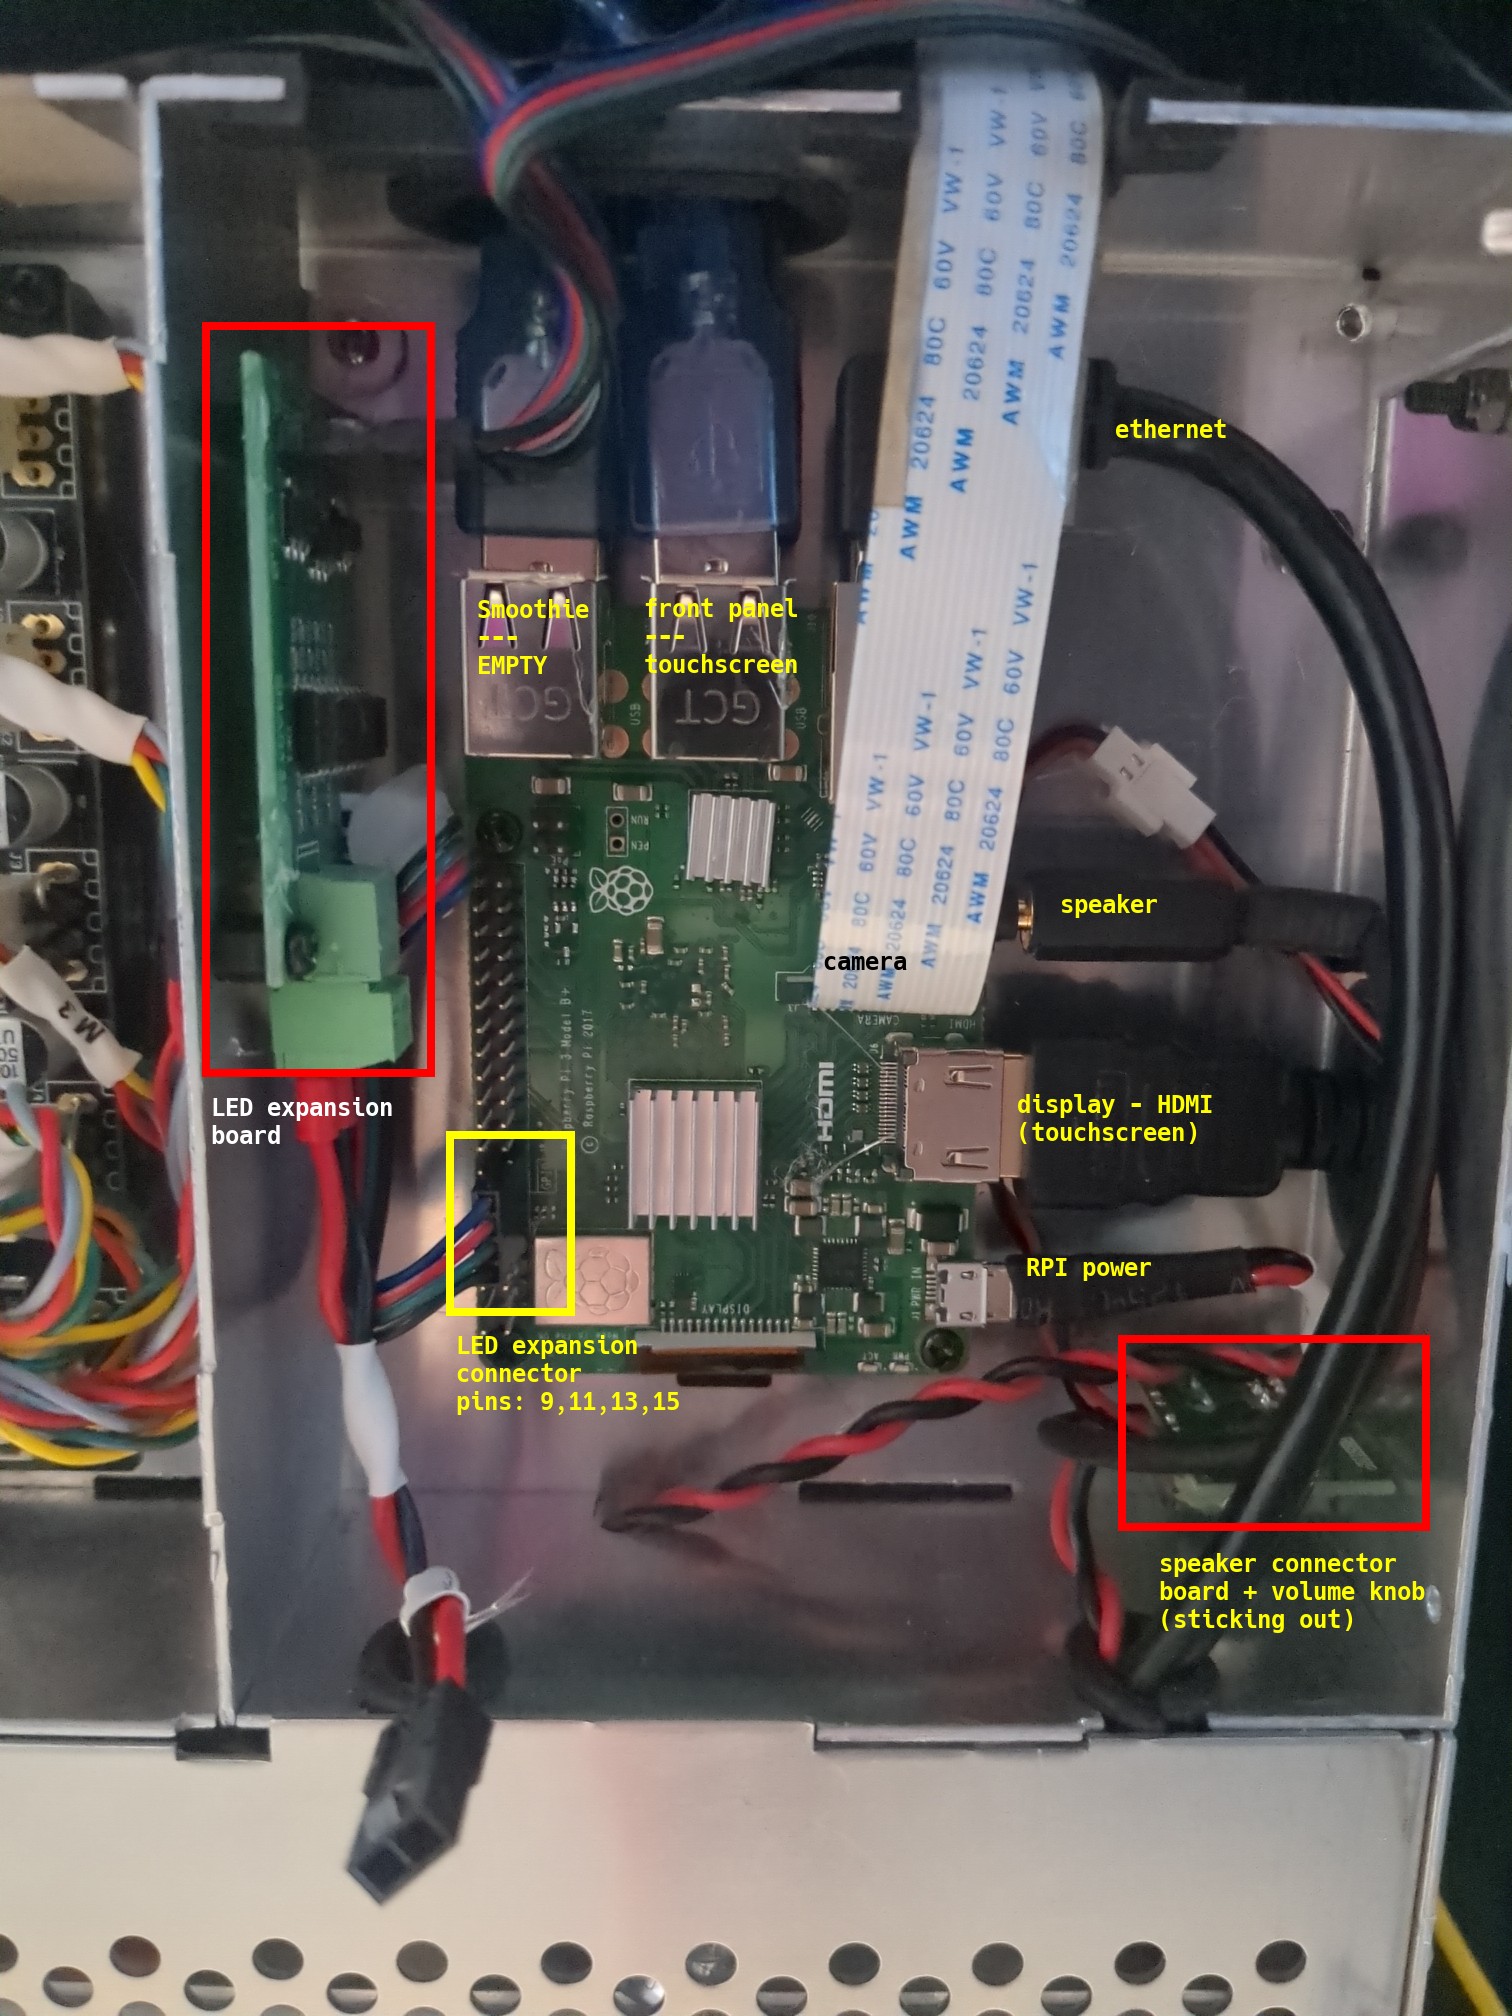
- standard raspberry pi 3b
- standard smoothieboard v1
- LED driver board connected to the rpi (generic 4pin - rgb+ground - pwm-driven ledstrip)
- removed most of hotglue as it did not hold the connectors anymore anyway
Raspberry PI
Nothing really surprising here
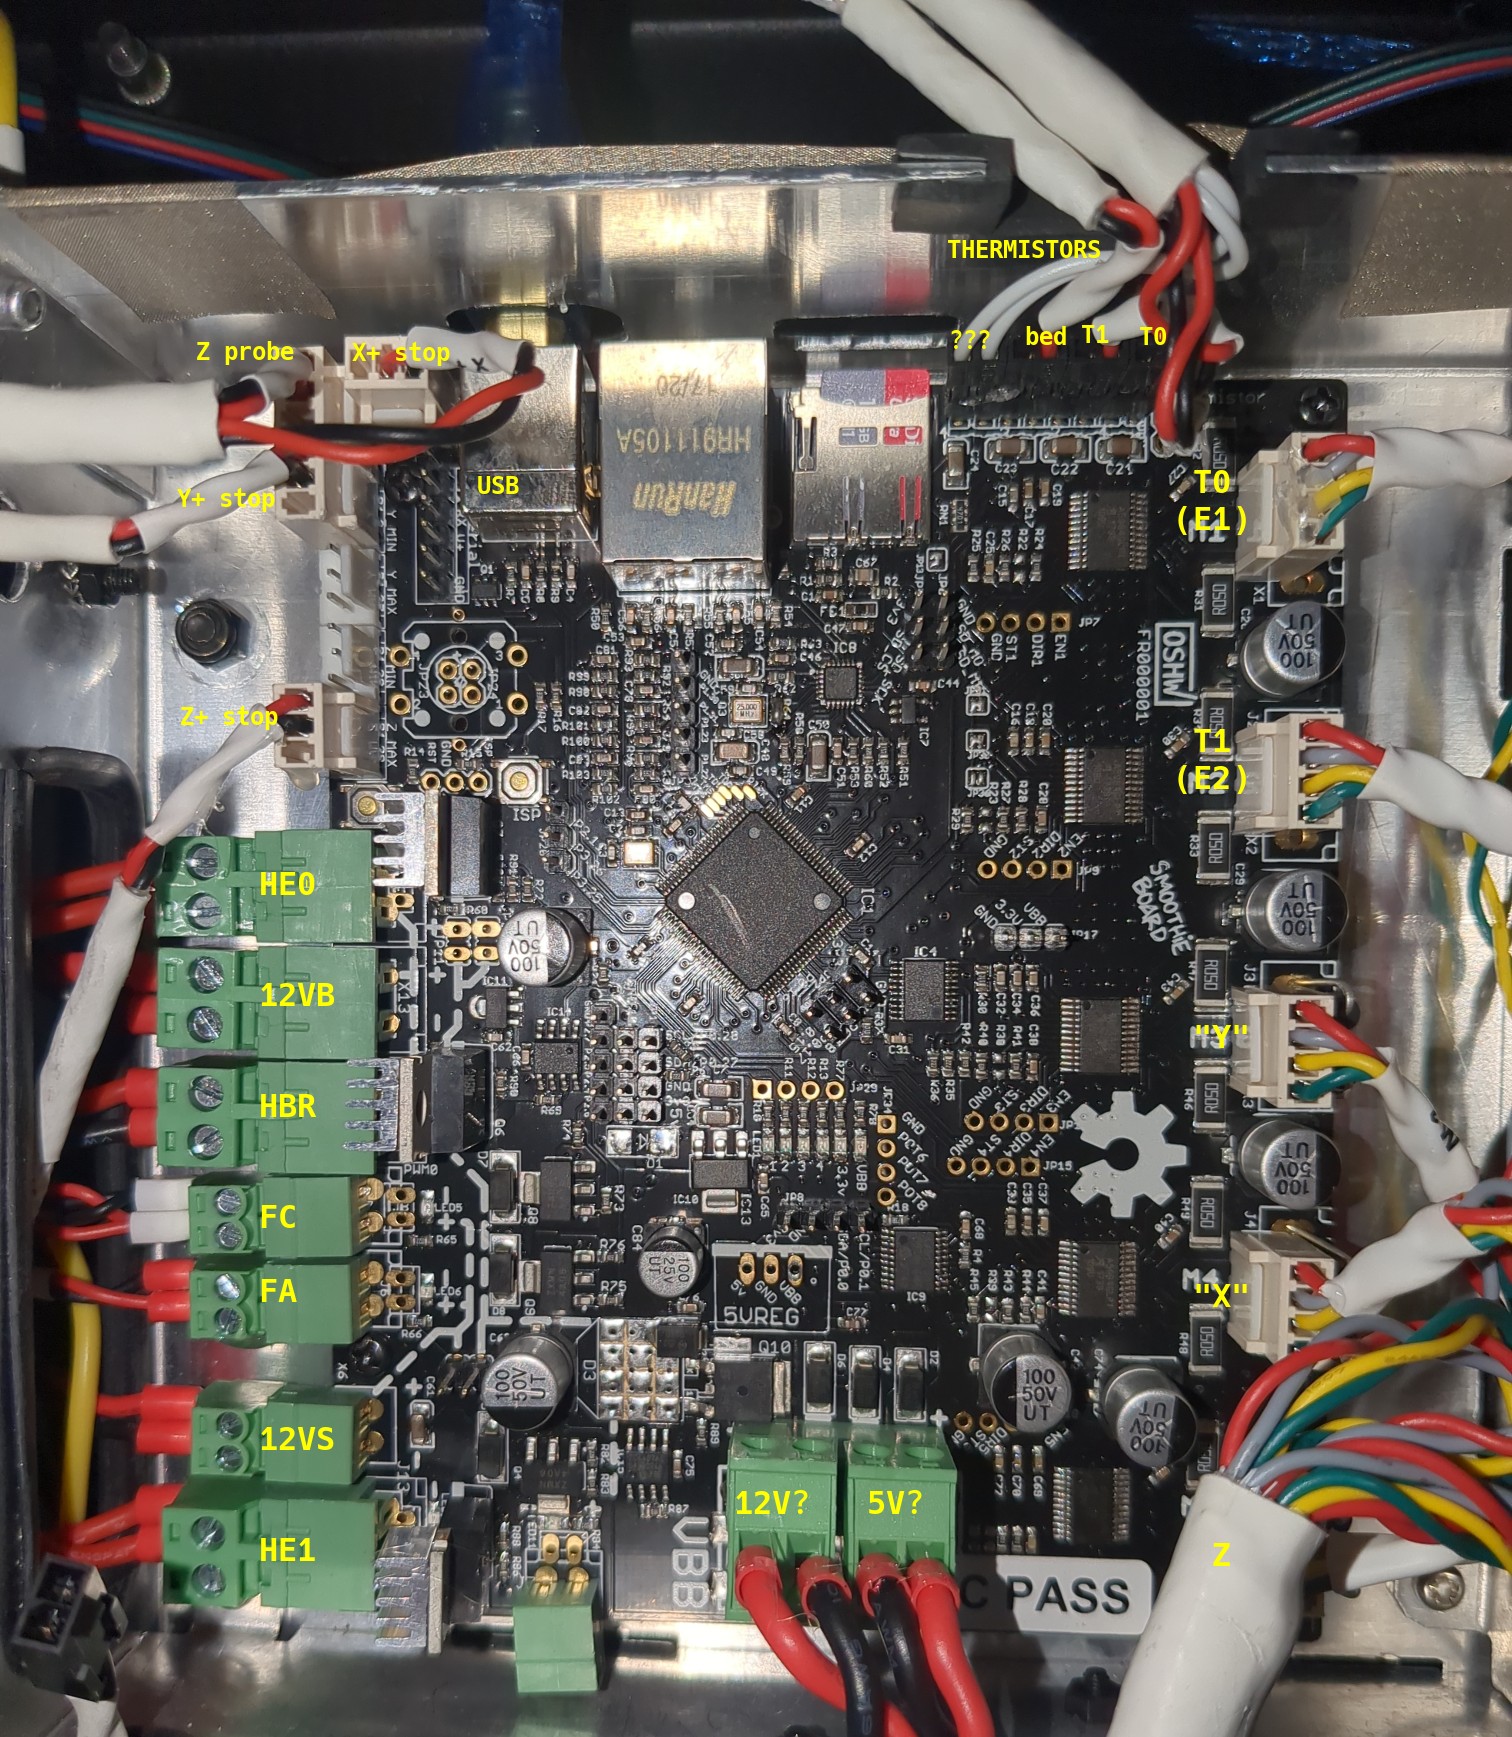
Smoothieboard
Almost all connected cables are labeled; motor connector labels are taken mostly from configuration file, as they were only labeled M{1..5}
Stock smoothieware config: https://code.hackerspace.pl/ar/kodak-portrait/src/branch/main/smoothie-stock/config
See also http://smoothieware.org/pinout
legend:
- HE0: heater for extruder 1
- HE1: heater for extruder 2
- HBR: heatbed heater
- FC: M106/M107 Fan; extruder fan(s?)
- FA: M42/M43 Fan; “ambient fan”? possibly the exhaust/filter fan
Config also references the two free endsop inputs as filament runout sensors, but neither sensors nor cables are present.
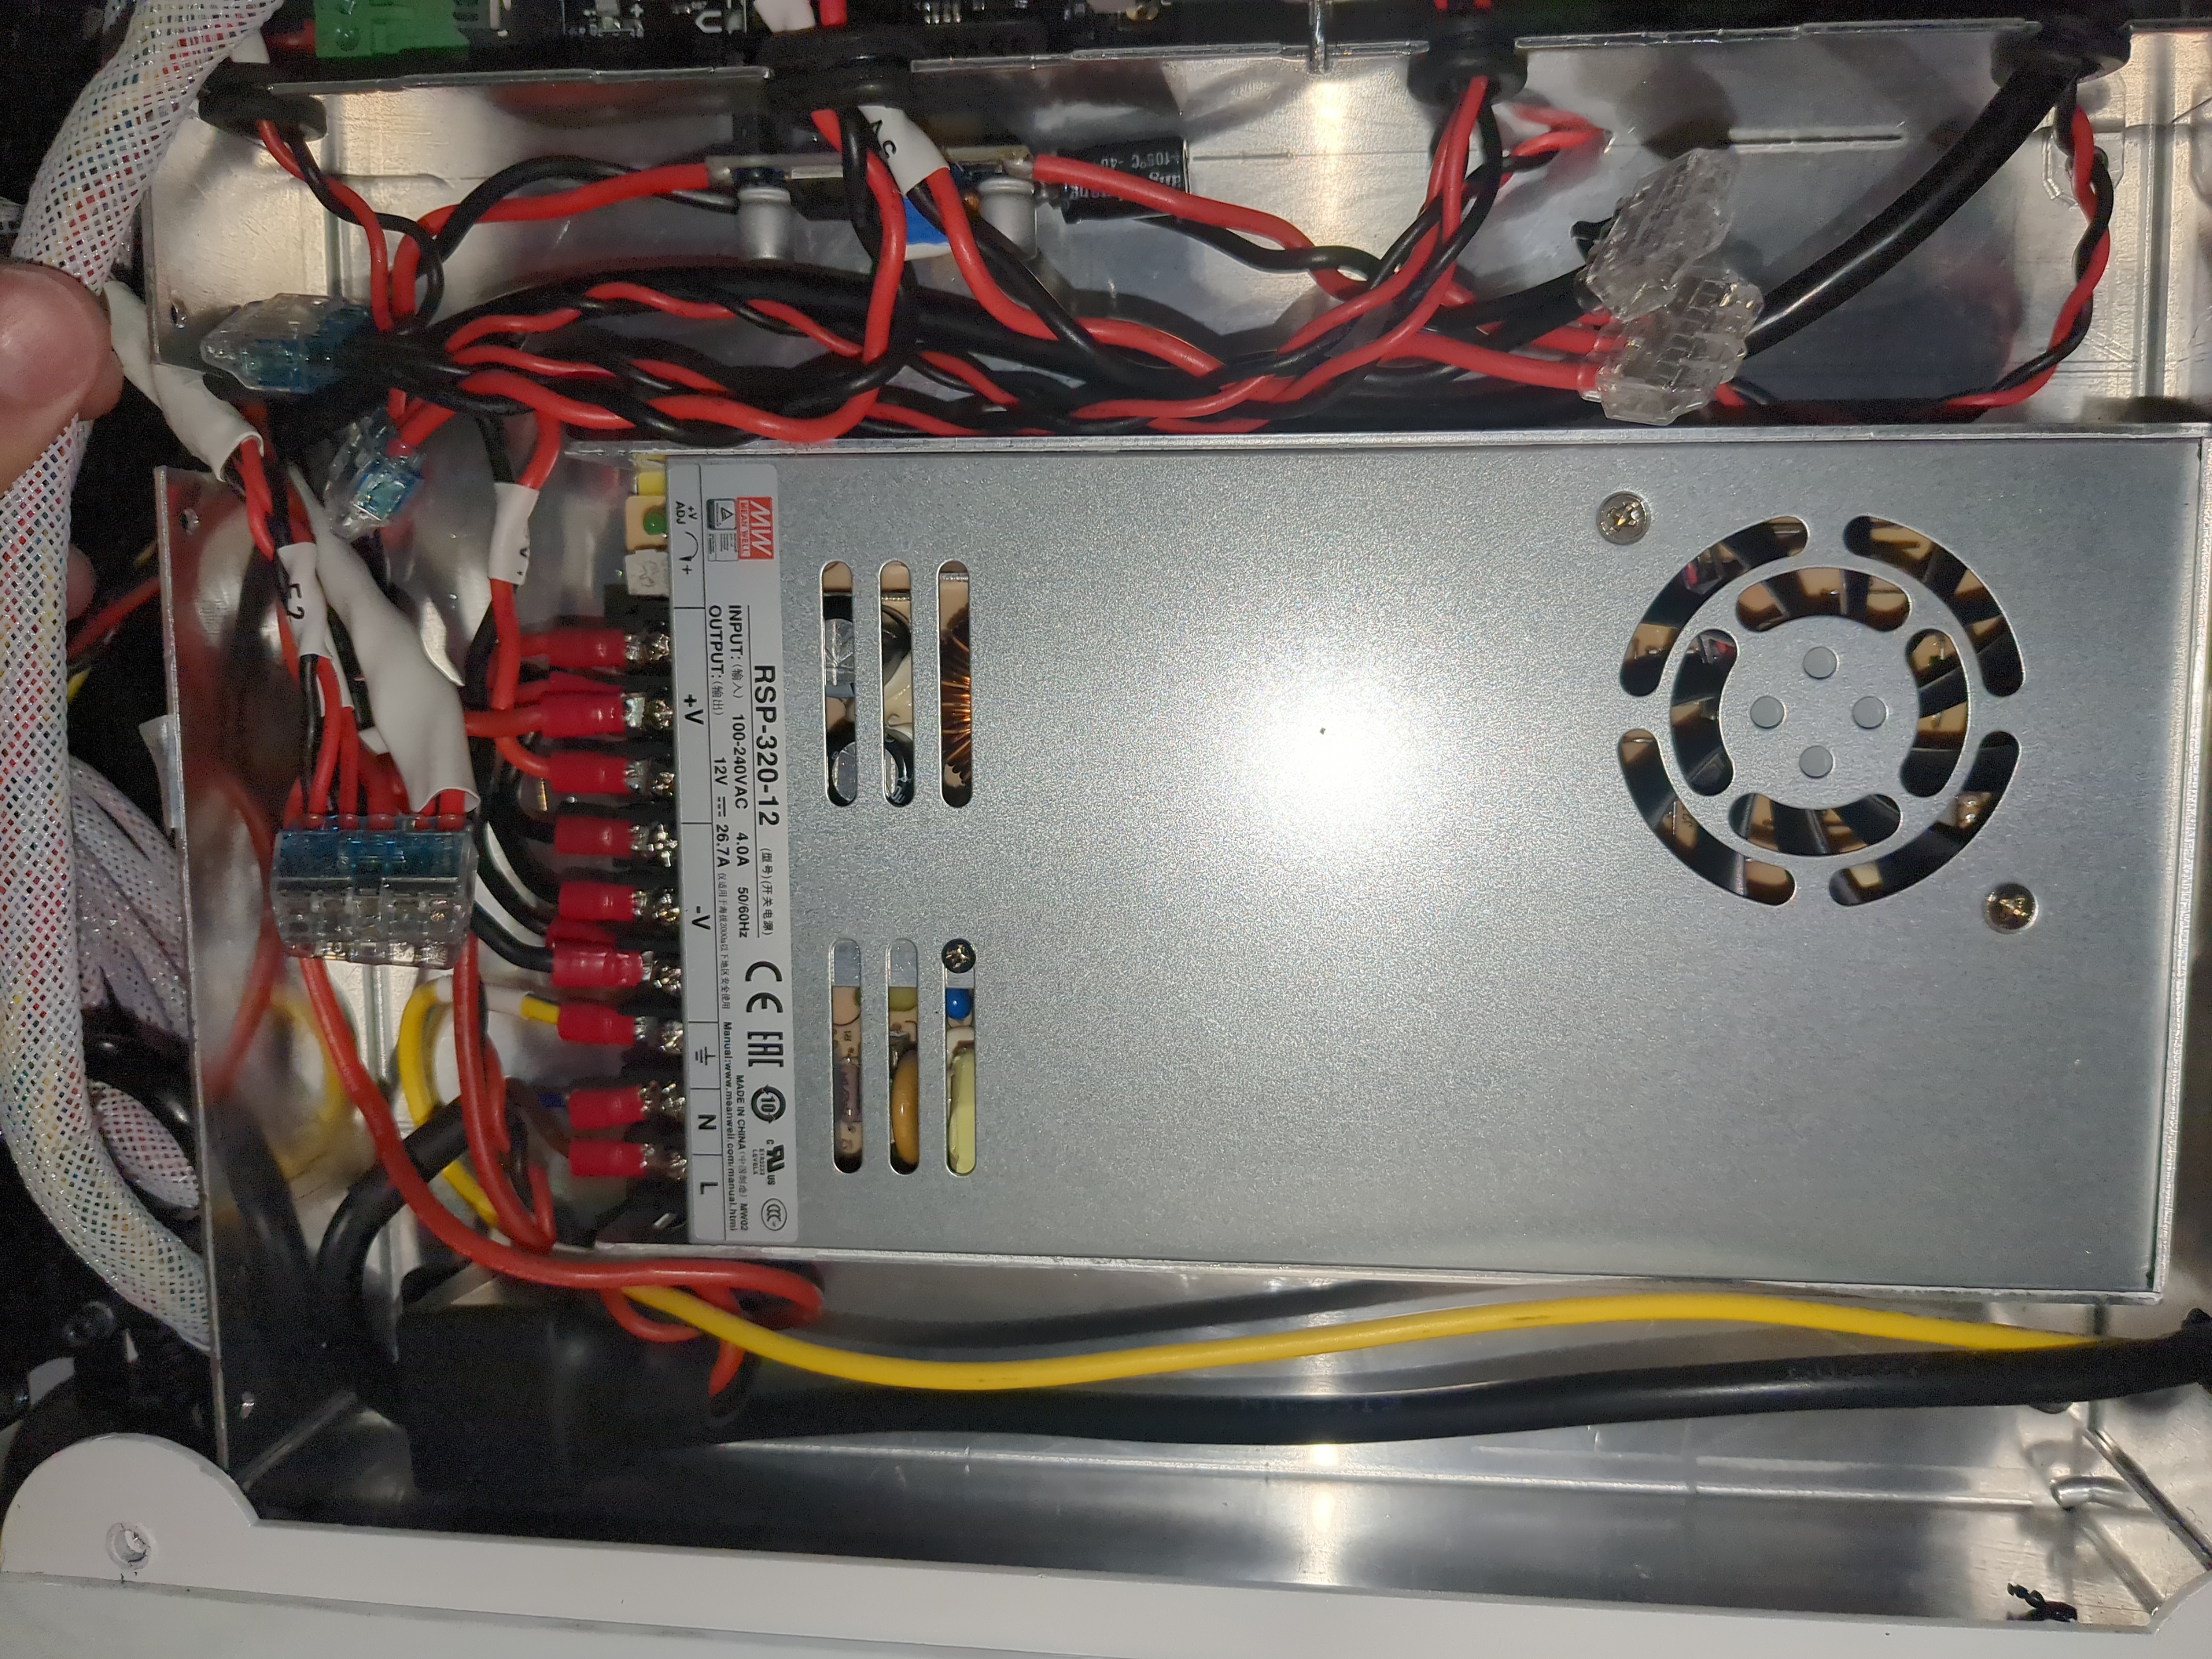
Power supply
Again, nothing really surprising here. Just a “Mean Well RSP-320-12” and a stepdown board providing 5V to rpi and smoothie

TODO
- pressure advance calibration
- accelerometer for input shaping
WIP
This section needs expansion. You can help by prodding my (ari) ADHD brain to do something with it, or pick an item from TODO list yourself.
- slicer profiles
- obtain second print surface
- pl0myk volunteered for handling this? ;)
DONE
This section needs expansion. You can help by prodding my (ari) ADHD brain to do something with it, or pick an item from TODO list yourself.
- hardware documentation (what's connected where and how)
- calibration, at least to the extent reasonable before we have proper slicer profiles
- general UI/UX:
- klipperscreen running in cage on the touchscreen
- fluidd for webui
- moonraker accessible over network for slicers
- fix camera/audio under nixos
- solve filament/power switch access
- now on a shelf next to the entrance, between main room and electronics lab
- filament runout sensors - ordered two, will need installing them properly and changing the printer config a bit
- bonus points for making filament a bit easier to insert
- The printer is now 300% more gay!
- Built-in macros change the chamber color at different parts of the print
- Klipper side of the configuration is now done, for the most part
- Moved significant parts of custom g-code in slicers to klipper gcode macros
- Hotends get primed in their respective areas
- converted the printer from 12V to 24V
- rework part cooling; it's abysmal
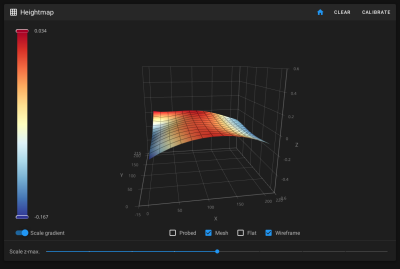
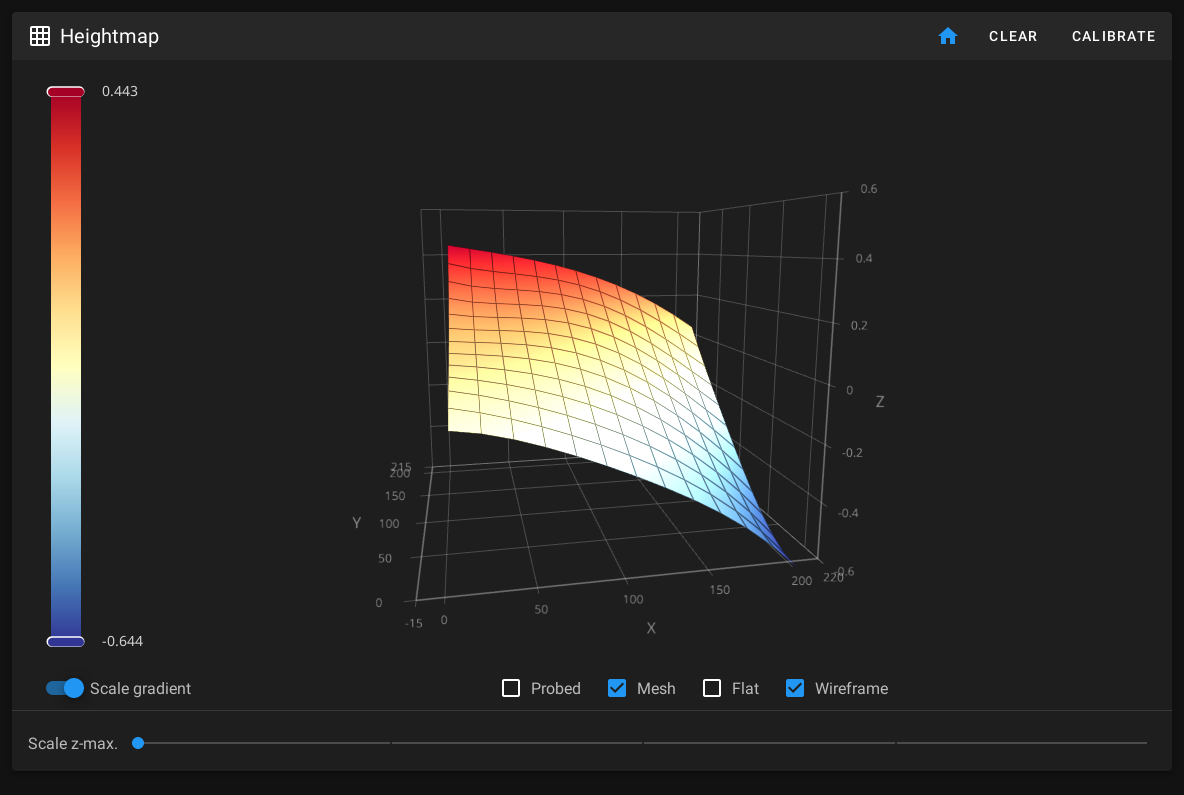
obtain more hotend socks, and rework the part cooling solutionno longer relevant - switched to revo- skewed bed
- the difference between far-left and front-right corners was around 1mm

- shimmed the bed enough to reduce the skew to 0.2mm
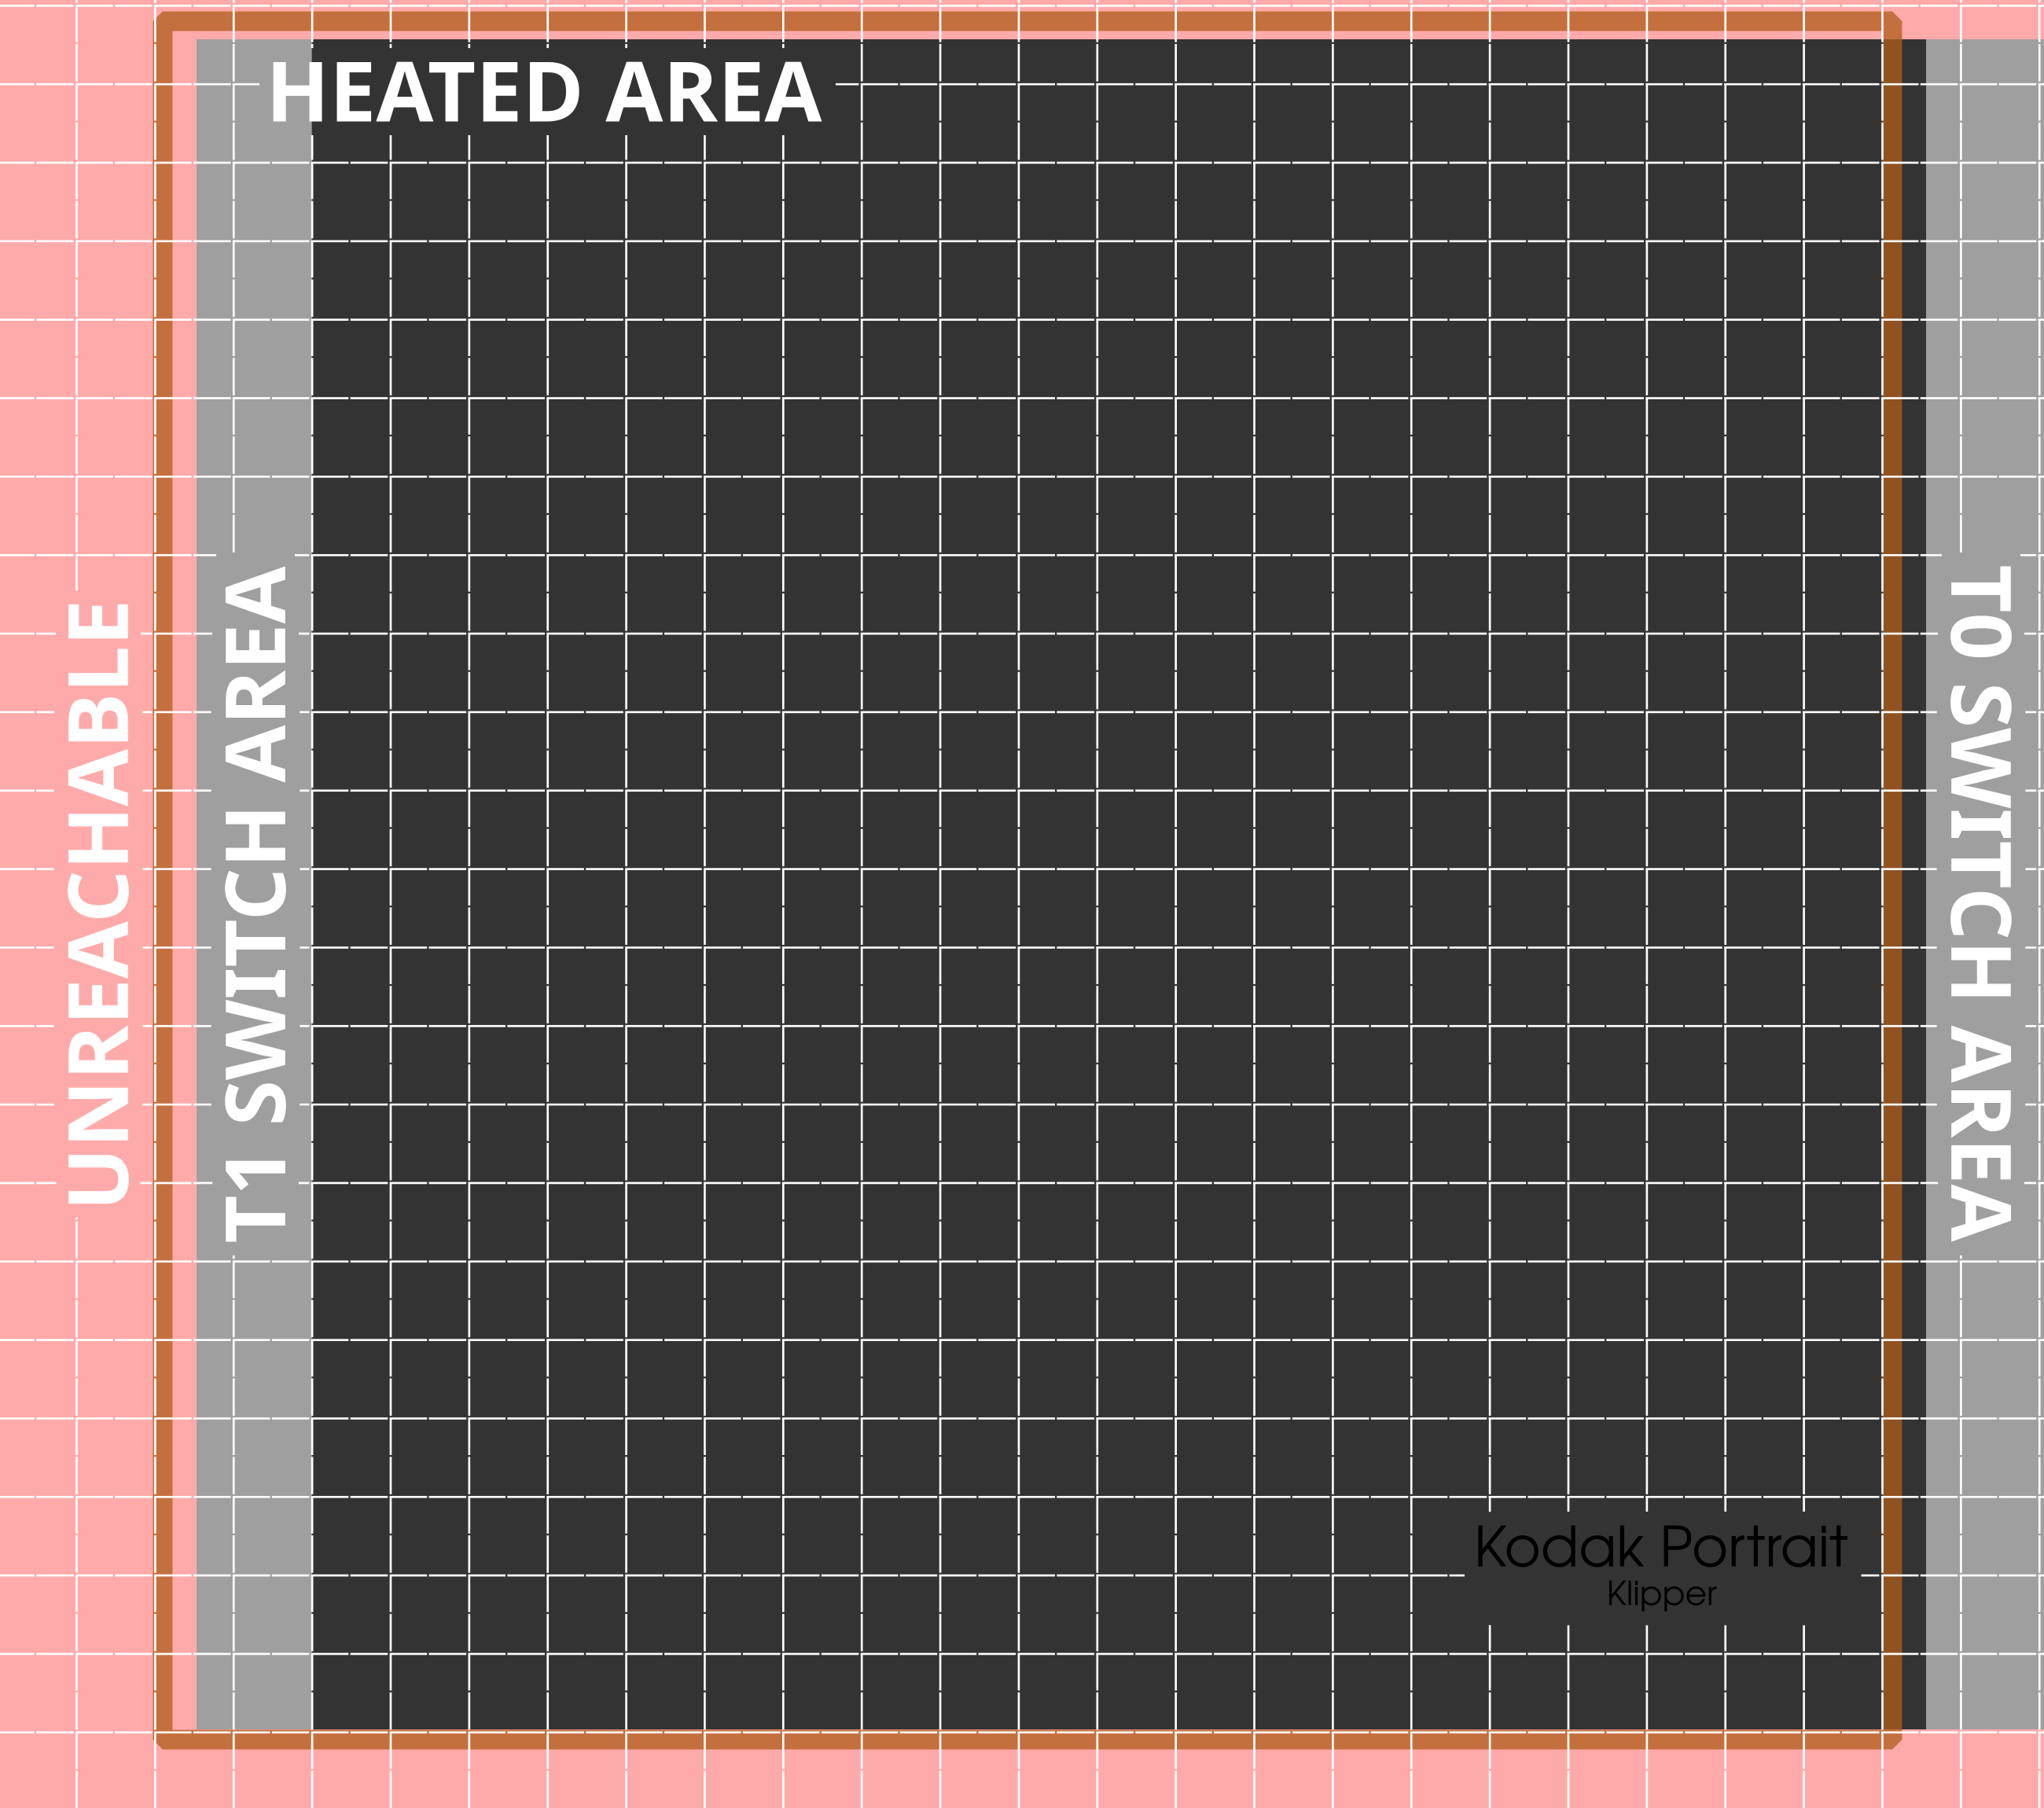
- actual printing area limitations
- embedding the limitations into actual slicer profile is proving to be difficult/impossible
- visual aids will have to do for now


Preliminary findings
- controlled with a normal rpi3 + smoothieboard combo
- screen is connected over hdmi (+ usb for touch?), 800×480 res
- camera uses the camera interface
- one usb port is used for connecting to smoothieboard, one is routed to the outside, and one is free
- there's a speaker!
- doesn't appear to do anything fancy to lock-out mods
- disassembly, at least for getting to the electronics compartment is trivial:
- unscrew two screws on left and right (4 total) that hold the bottom panel (regular hex bit)
- unscrew the feet (next size larger hex bit)
- unscrew 4 screws on the *sides* of the metal box holding the electronics (the ones that you see in front of you hold the fans)
- remember to detach the fans when opening the box
no longer relevant
these items referred to stock software/firmware, leaving them here for future reference for anyone from the wider internets stumbling upon this page
- ran raspbian by default
- didn't complain about creating
/root/.ssh/authorized_keys - on running system, root filesystem is by-default mounted readonly, which is a Good Choice™ on an rpi with sd card;
mount -o remount,rw /and latermount -o remount,ro /work as expected. - password for
piuser is, for now, identical to hswaw wifi password, passwordless sudo is enabled. - the printer runs its control panel using chromium pointed at a webserver running locally. that's listening on all interfaces. try http://printers-ip-address:8888/home (check setup → connectivity → network)
- „Myślę, że w tym przypadku masz do czynienia nie tylko z powierzchnią ataku, ale również z objętością” ~ drozdziak1
Resources
Many resources about the printer from, apparently, its actual vendor: https://exolicious.com
Plans
Would prefer to keep hardware mostly unmodified, except for following xD
- replace the e3d v6 with e3d revo (and obxidian nozzles) which is almost a drop-in replacement
- done
- replace the 12V PSU with 24V
- done
- add filament runout sensors
- done
- buy angled cables and rotate the screen proper way round.
- done & undone; viewing angles on the screen are meh; back to rotation hacks
- accelerometer for input shaping
- brushes for automated nozzle cleaning