This is an old revision of the document!
Table of Contents
Hacking the Zsun WiFi SD Card Reader

The goal of this project is to learn as much as possible about the Zsun WiFi card reader and run OpenWrt on it to turn it into an awesome wifi device.
People Involved
- emeryth (emeryth at hackerspace.pl) ← contact me about the project
- q3k (q3k at hackerspace.pl)
- informatic (informatic at hackerspace.pl)
Current status
All the important aspects of hardware are understood.
OpenWrt Chaos Calmer ported (but not yet thoroughly tested), can be flashed over telnet if you dare.
What can I do with it?
- Use it for its intended purpose of serving files, duh
- Use as a tiny and pretty good WiFi AP/client/repeater (the hardware supports multiple simultaneous wireless interfaces!)
- Play around with OpenWrt
- Use it as the brains of your IoT project
- Buy a dozen and play around with mesh networking
- Use it for distributed WiFi activism like PirateBox or OccupyWiFi
- Host Node.js on it and take your apps to your favorite coffee shop :^)

Size comparison with a single 18650 cell powerbank.
Hardware
- AR9331 SoC
- 64MB RAM
- 16MB SPI Flash
- GL827L USB SD Card Reader
The device consists of two PCBs sandwiched together and connected via 8 pins.
The bottom PCB contains only the SD card reader chip and SD slot, it can be safely removed without affecting operation.
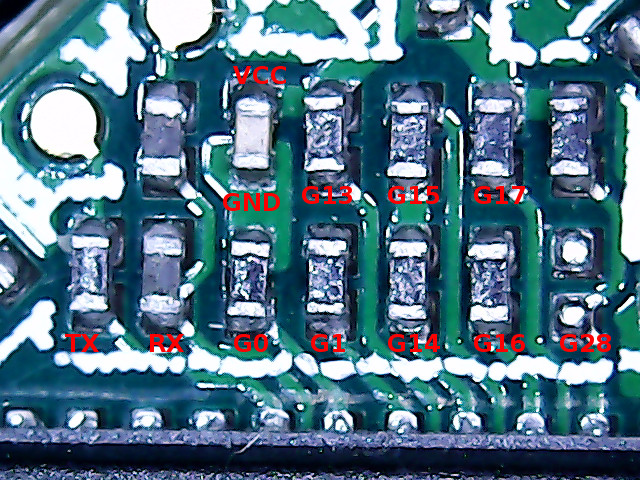
Serial Port
The serial console is brought out on testpoints (see pictures). Bitrate is 115200.
Original firmware root password is “zsun1188”
Ethernet Port
There are testpoints for connecting an ethernet port (eth1 of the SoC).
Use a Magjack or similar connector with magnetics.
This port is required for uploading images to u-boot.
USB switch
The device contains a WAS7227Q USB switch, which connects the sd card reader chip to either the USB plug, or the AR9331 SoC.
The switch is controlled with GPIO21. Set pin to LOW to connect card reader to SoC.
GPIO
- GPIO0 - LED
- GPIO18 - card reader reset
- GPIO21 - USB switch
- GPIO22 - card detect
Hardware hacking
If you remove the card reader board you get easy access to one USB port and 3 GPIO pins. Remember that GPIO is 2.5V!
GPIO pins and bootstrap
Here's a closeup of the bootstrap GPIO pins, perhaps useful if you want to try enabling USB device mode.
Bootstrap functions:
- GPIO 0 : Crystal frequency of external clock 0=25, 1=40 MHz
- GPIO 1 : Booting from internal 0=ROM, 1=SPI Flash
- GPIO 11: 0=General JTAG, 1=CPU ICE
- GPIO 12/28 : external memory type (00=SDR, 01=DDR, 10=DDR2)
- GPIO 13: USB mode 0=device, 1=host
- GPIO 16: Download firmware from 0=USB, 1=MDIO
Original firmware
The original firmware is full of holes, including an always on telnet backdoor on port 11880. Source: http://www.zoobab.com/zsun-sd11x-wifi-card-reader
Regular telnet won't work but you can connect using socat:
$ socat - TCP4:10.168.168.1:11880
������!����
(none) login: root
root
Password: zsun1188

Welcome to
         -------      |            /    /--/        ___      |
          /           |           /|     \/        _____   --|--|
         /_____\      |---       --|--   //--/      /        /  |
          __|__       |           /|\    / \/      /___\    /   |
         ___|___   ___|____      / | \     /               /   \|
                        深圳至上移动科技有限公司
                        Shenzhen Zsun Cloud Technology Co., LTD.
                        www.zsuncloud.com

BusyBox v1.01 (2014.12.27-02:50+0000) Built-in shell (ash)
Enter 'help' for a list of built-in commands.

~ #
If you want to use proper telnet just run it on different port with:
telnetd -p 2137
OpenWrt
WARNING Still under development
My OpenWrt port, based on the 15.05 “Chaos Calmer” release:
https://code.hackerspace.pl/emeryth/openwrt_zsun/
Compiled images and image builder:
https://owncloud.hackerspace.pl/index.php/s/7s5c5RDS7Njgwpv
This port sticks to the original flash layout.
I've added a few things to this port to make it more usable on the zsun without having to solder.
- Wifi is enabled by default, AP mode, no encryption
- Entering failsafe will run a script that automatically does a factory rest
- The SD card detect pin is registered as a button and will trigger failsafe when inserted/removed during boot
- The SD card reader is reset every time a card is inserted or removed
Flashing
Here are some ways you can flash the device:
- Solder on an ethernet jack and flash from the original uboot (hard but safe)
- Reflash the bootloader from the original firmware to one that supports upload over serial (less soldering but fatal if you mess up)
- Reflash the firmware from the original firmware using mtd_write (easy but you have to do it right on the first try)
- Attach a programmer to the flash chip (impossible to mess up)
Flashing with original uboot
Attach an ethernet jack and serial cable, setup a TFTP server on your PC with a static IP 10.168.168.10
Then at the uboot prompt enter the following commands:
tftpboot 80060000 openwrt.bin
erase 9f020000 +${filesize}
cp.b 80060000 9f020000 ${filesize}
Where openwrt.bin is your rootfs+kernel image (in that order!).
Flashing from original firmware (mtd_write)
There are multiple ways to get files onto zsun rootfs, one of which is TFTP (pretty easy to setup, no need for SD card) To start TFTP server on your Linux computer you can use dnsmasq, like this:
sudo dnsmasq -p0 --enable-tftp --tftp-root=`pwd` -d --user=`whoami`
# serves files off your current directory, remember to chmod o+r files you'd like to use
Then download your files onto zsun's /tmp (ramfs is mounted there), copy mtd_write to ramfs too, just to be safe, and write them with mtd_write. Keep in mind you have to flash kernel first, since rootfs is used by running system.
$ socat - TCP4:10.168.168.1:11880
(none) login: root
Password: zsun1188

[...]

# cd /tmp
# tftp -g 10.168.168.100 -r openwrt-ar71xx-generic-zsun-sdreader-kernel.bin
# tftp -g 10.168.168.100 -r openwrt-ar71xx-generic-zsun-sdreader-rootfs-squashfs.bin
# cp /sbin/mtd_write /tmp
# cat /proc/mtd
dev:    size   erasesize  name
mtd0: 00010000 00010000 "u-boot"
mtd1: 00010000 00010000 "u-boot-env"
mtd2: 00e90000 00010000 "rootfs"
mtd3: 00130000 00010000 "uImage"
mtd4: 00010000 00010000 "NVRAM"
mtd5: 00010000 00010000 "ART"
# /tmp/mtd_write write openwrt-ar71xx-generic-zsun-sdreader-kernel.bin /dev/mtd3
Unlocking /dev/mtd3 ...
Writing from openwrt-ar71xx-generic-zsun-sdreader-kernel.bin to /dev/mtd3 ... [w]
# /tmp/mtd_write write openwrt-ar71xx-generic-zsun-sdreader-rootfs-squashfs.bin /dev/mtd2
Unlocking /dev/mtd2 ...
Writing from openwrt-ar71xx-generic-zsun-sdreader-rootfs-squashfs.bin to /dev/mtd2 ...  [w]
Bus error
“Bus error” indicates system finished flashing, you can now just power cycle the device and wait for open “OpenWRT” network. First boot takes quite some time.
Pictures


